How to Add Subtitles to a Video Online Free: 2026 Guide & Tools
In 2026, silent video consumption has become the standard behavior for internet users. Whether scrolling through social feeds during a commute, watching clips at work, or browsing in bed, a significant portion of media is consumed with the sound turned off. To keep viewers engaged, creators must provide readable, high-quality text overlays.
This technical guide demonstrates how to add subtitles to a video using three distinct methods, prioritizing efficiency, visual style, and platform compatibility.
Quick Summary: Which Method Should You Choose?
If you are short on time and want to find the most efficient way to add text to your media, here is a quick overview of the top three workflows:
- The Online Automated Method: Utilizing a web-based tool like the AddSubtitles platform is often the most practical route for fast turnarounds. It uses artificial intelligence to transcribe spoken dialogue, allows you to customize the styling, and permanently burns the text into the video files without requiring software downloads.
- The Professional Desktop Method: Traditional editors like Adobe Premiere Pro offer highly advanced timeline controls, making them suitable for complex, offline multi-track video projects, though they carry a steeper learning curve and require higher system resources.
- The Native Hosting Platform Method: Video hosts like Vimeo allow you to upload external sidecar files (such as SRT or WebVTT) to toggle closed captions on or off, which is highly useful for standard web player environments.
Method 1: The Online Automated Way (Using AddSubtitles)
For creators looking for a fast, web-based solution, the AddSubtitles platform simplifies the entire transcription and rendering workflow.
This browser-based subtitle generator is designed for speed and requires no prior editing experience. By shifting the processing power to secure cloud servers, it eliminates the need to install resource-heavy software on your computer.
Key Technical Features:
- Automated Speech Recognition (ASR): The tool features highly accurate speech-to-text algorithms that aim for up to 99 percent accuracy rate under clear audio conditions, supporting automatic language detection for over 100 global languages and dialects.
- Deep Design Customization: Unlike basic players that lock you into boring text styles, you can choose from 28 professional visual presets. You can adjust colors using hex codes, pick custom Google Fonts, and apply dynamic styling for viral hooks (automatically emphasizing key terms with unique weights or colors).
- Flexible Text Positioning: The tool provides vertical alignment controls, allowing you to position subtitles at the top, center, or bottom of the screen.
- Automatic Safe Zones: To prevent your captions from being obscured by platform user interfaces (such as like buttons or channel logos on TikTok, Instagram, or YouTube Shorts), the renderer automatically calculates safe zones for standard aspect ratios (9:16, 1:1, and 16:9).
- Processing Limits: The platform processes standard-definition videos (1080p or lower) up to 2 hours in duration, and high-resolution videos (such as 2K or 4K) up to 1 hour per video.
Step-by-Step Instructions:
Step 1: Upload Your Video or Subtitle File
Open your browser and navigate to AddSubtitles. Upload your video file (supporting MP4, MOV, or WebM formats) into the upload area.
If you already have a prepared transcript, you can bypass the automated speech recognition phase completely. The platform features a dual-input architecture that allows you to upload a custom SRT file or paste raw SRT text directly into the caption generator.
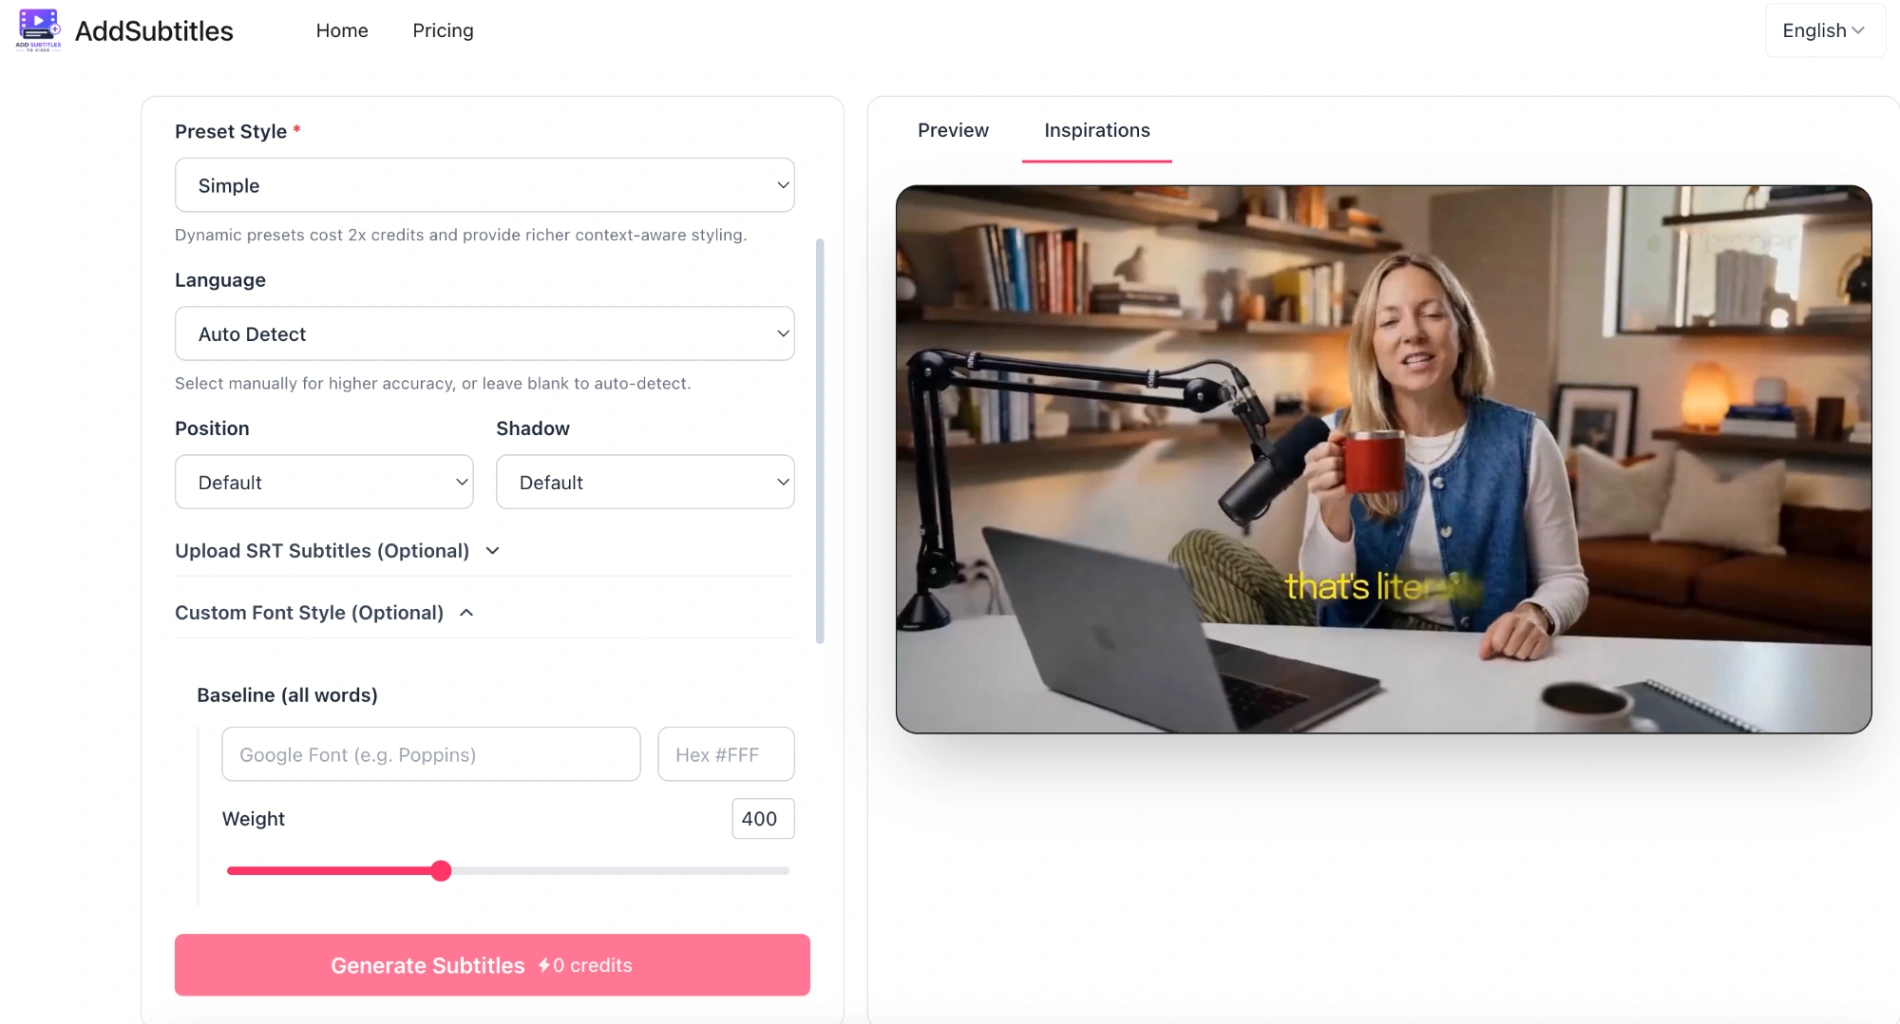
Step 2: Select the Spoken Language and Design Your Style
If you are generating automatic captions, select the exact spoken language from the dropdown menu to help the system recognize unique accents or regional terms. Next, open the preset style panel to customize your subtitles.
Using an advanced AI caption generator allows you to select customized fonts, adjust text shadows, and choose a dynamic preset that fits your visual brand.
Step 3: Render and Save Your MP4
Click the "Generate Subtitles" button to let the system align your text with the audio timestamps. Once processed, you can download a high-resolution, ready-to-publish MP4 file with the styled subtitles permanently hardcoded into the video.
This approach ensures that your chosen fonts and animations remain fully intact on any device or hosting platform. For those who specifically need to process standard video formats, you can easily add subtitles to MP4 videos using this automated rendering pipeline.
(Tip: Background music or overlapping voices can sometimes confuse AI transcription. For the best accuracy, try to isolate or clean up your voice track before uploading.)
Method 2: The Desktop Software Way (Adobe Premiere Pro)
For projects that require multi-track video editing, offline workflows, or complex sound mixing, desktop applications like Adobe Premiere Pro remain a standard option.
Step-by-Step Instructions:
- Import and Open Timeline: Import your video file (such as an MP4, AVI, or MOV file) and place it onto your editing sequence timeline.
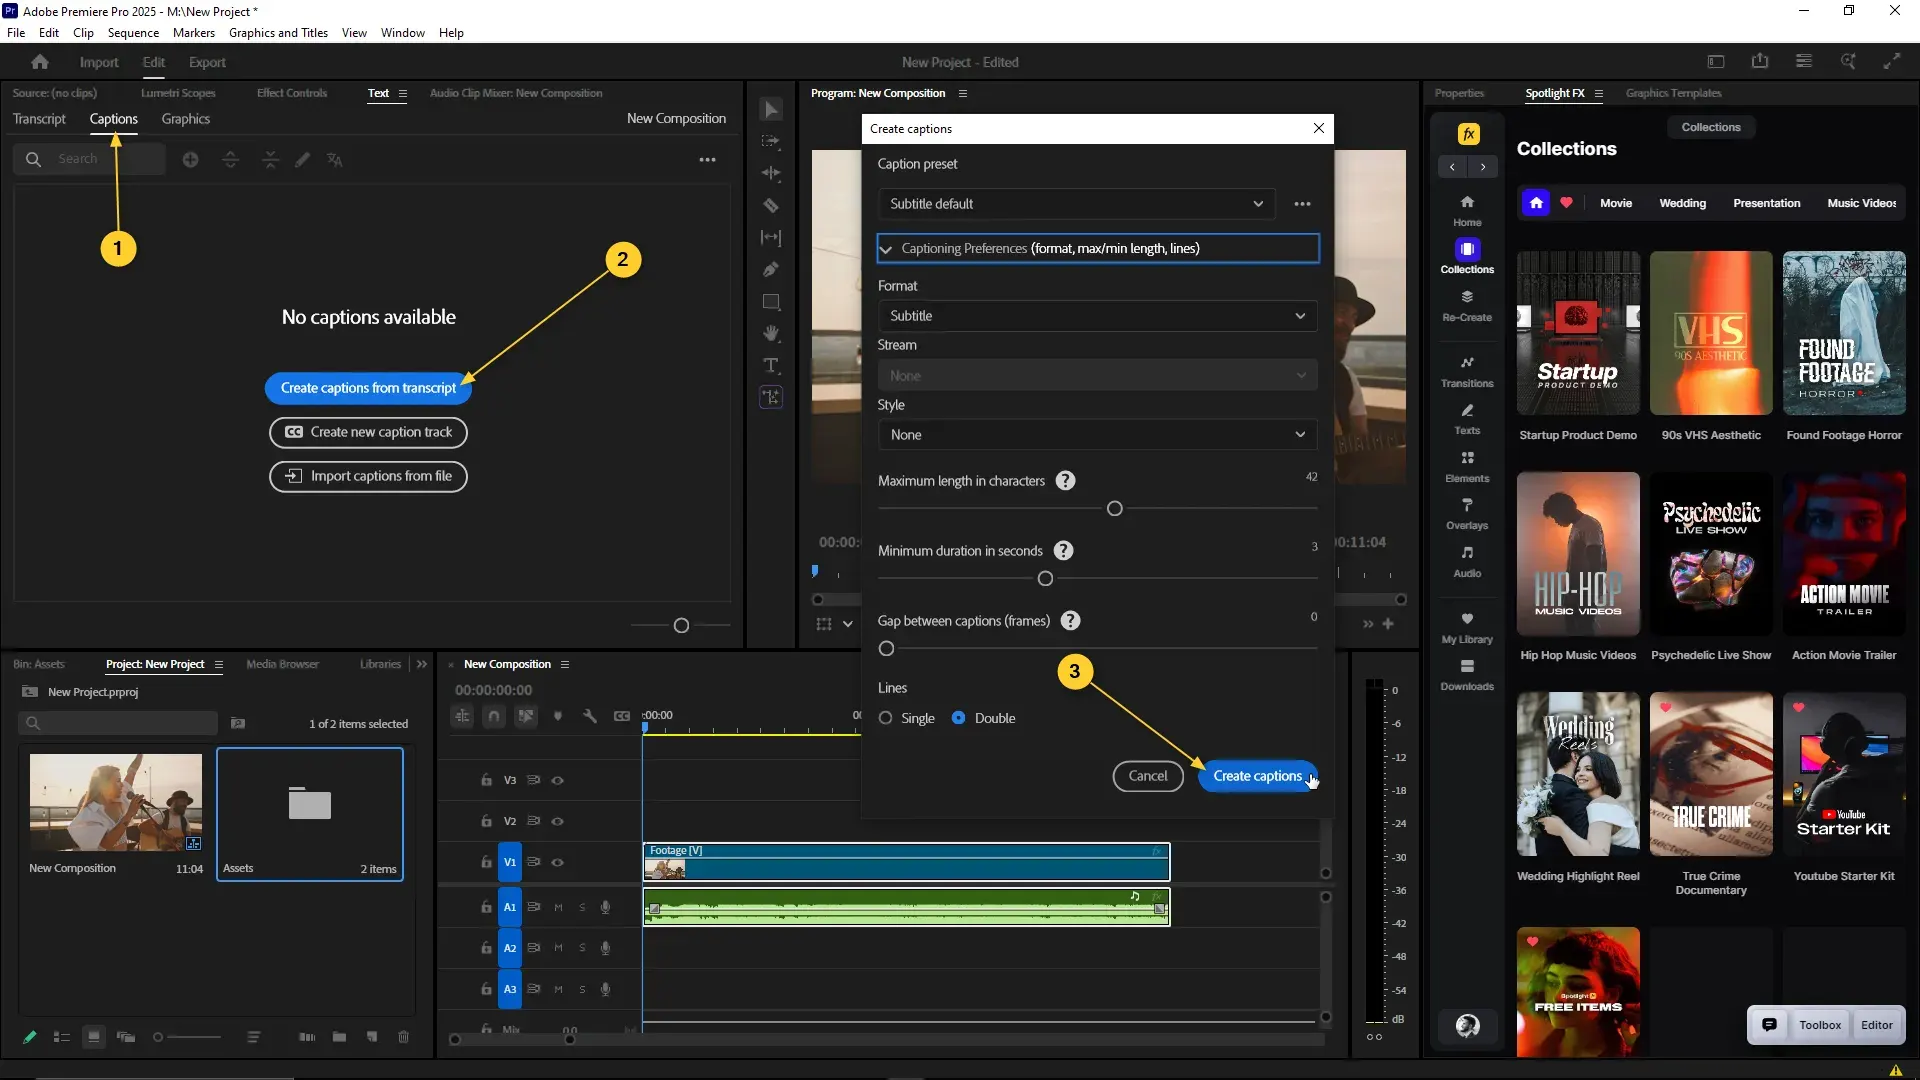
- Access the Text Workspace: Navigate to the top menu, select Window, click Workspaces, and choose Captions to reveal the caption editing workspace.
- Generate Caption Track: Click on Create New Caption Track in the Text panel. Select "Subtitle" as your primary format.
- Choose Your Transcription Path:
- Automated Desktop Transcription: Select Transcribe Sequence to let Premiere's built-in engine transcribe the audio track.
- Import an SRT File: If you already have a sidecar file, click the import icon to load your SRT file, which will automatically align with the timeline based on its integrated timing codes.
- Adjust Timestamps and Styling: Manually drag the handles of individual subtitle blocks on your timeline to align them with the audio waveforms. Use the Essential Graphics panel to select your fonts, adjust paragraph alignments, and set background fills.
- Export Your Finished File: Go to File, select Export, and click Media. Under the Captions tab, choose whether to export an independent sidecar file or select "Burn Captions into Video" to render them permanently into your final video file.
Method 3: The Platform-Native Way (Using Vimeo)
If you host your media on platforms like Vimeo, you can manage closed captions using independent sidecar text files. This method keeps your original video asset clean while allowing viewers to toggle subtitles on or off in their player settings.
Step-by-Step Instructions:
- Log In and Select Video: Open your Vimeo dashboard and select the uploaded video you wish to edit.
- Open the Subtitle Panel: On the left side of the player interface, click on the Languages icon (represented by a speech bubble or language menu).
- Upload Your Sidecar File: Click the plus (+) button next to the subtitles header. Choose a formatted WebVTT or SRT file from your hard drive. (To avoid display issues with unique character sets or symbols, ensure your text file is encoded in UTF-8 format).
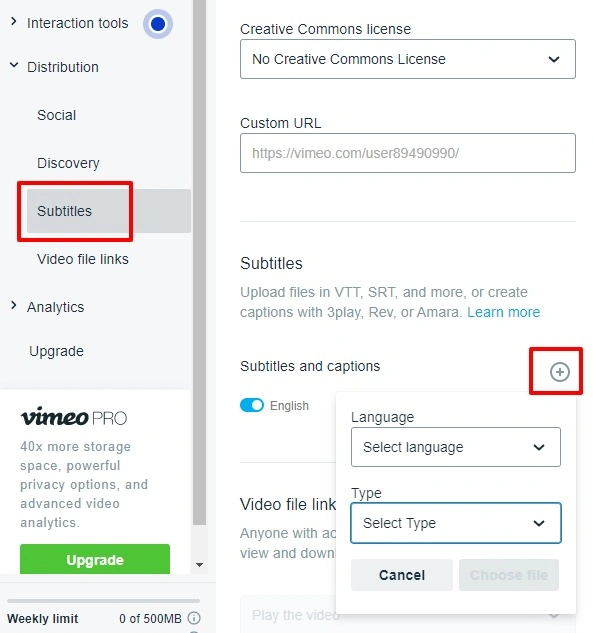
- Specify Language and Type: Select the matching language from the dropdown menu and indicate whether the file represents standard "Subtitles" (translations) or "Captions" (including non-speech audio descriptions).
- Publish Changes: Toggle the file to the active position. Viewers can now click the "CC" button on the player to display your subtitles while watching the video.
(Note: When saving custom SRT files for platforms like Vimeo, always ensure the file encoding is set to UTF-8. Otherwise, special characters or non-English letters might render as broken symbols.)
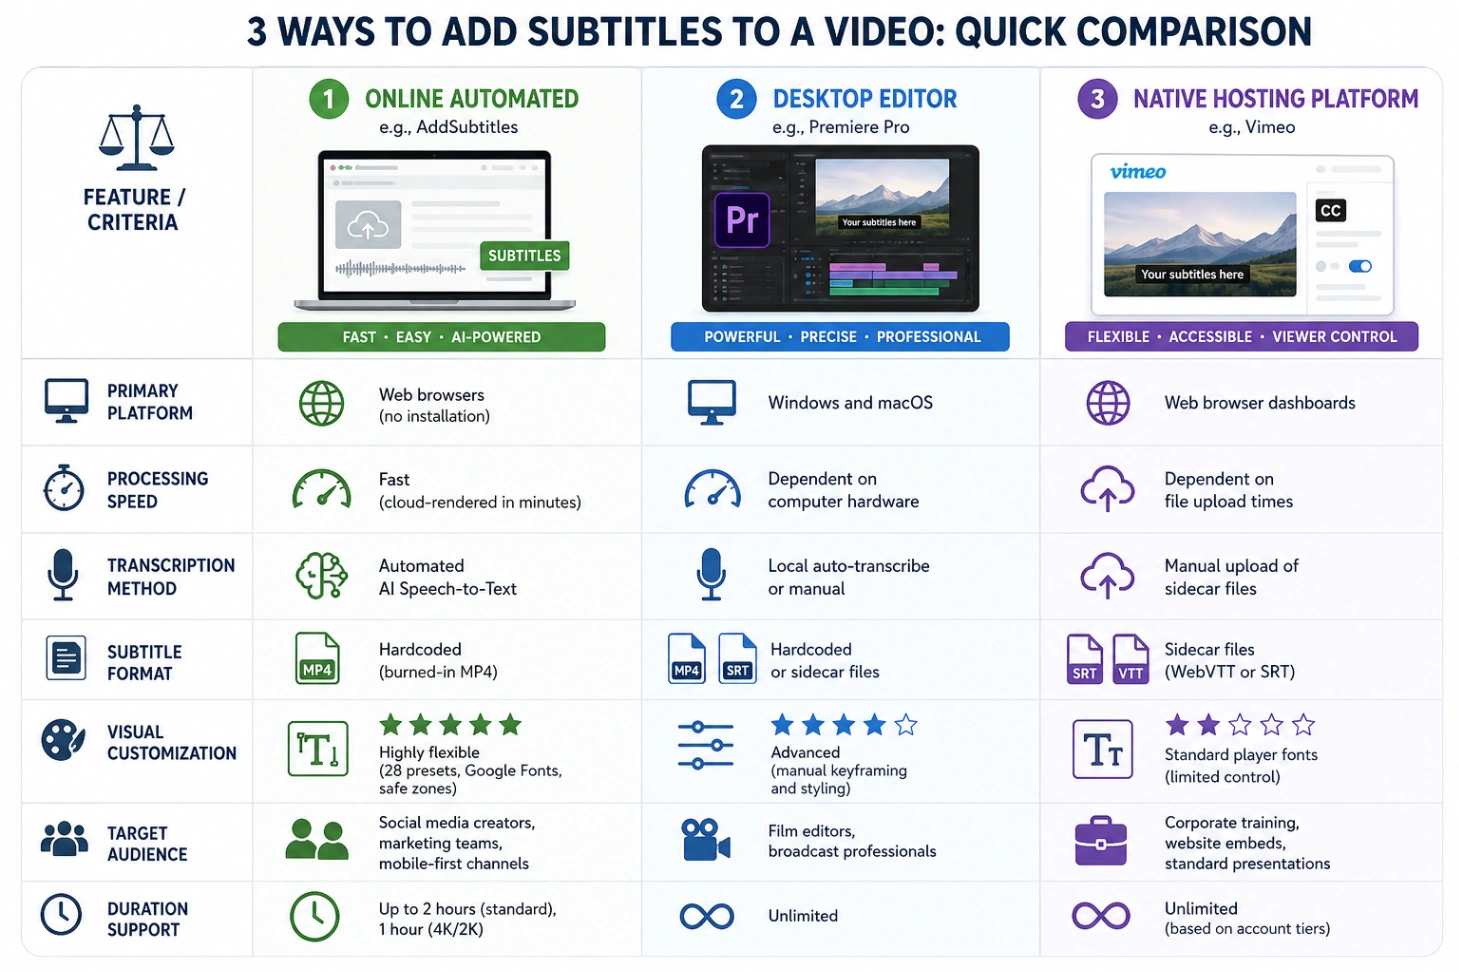
Comparison Matrix: Subtitle Methods at a Glance
When deciding how to add subtitles to video, comparing the technical aspects of each method can help you choose the best workflow for your project.
| Feature / Criteria | Online Tools (e.g., AddSubtitles) | Desktop Editors (e.g., Premiere Pro) | Video Hosts (e.g., Vimeo) |
|---|---|---|---|
| Primary Platform | Web browsers (no installation) | Windows and macOS | Web browser dashboards |
| Processing Speed | Fast (cloud-rendered in minutes) | Dependent on computer hardware | Dependent on file upload times |
| Transcription Method | Automated AI Speech-to-Text | Local auto-transcribe or manual | Manual upload of sidecar files |
| Subtitle Format | Hardcoded (burned-in MP4) | Hardcoded or sidecar files | Sidecar files (WebVTT or SRT) |
| Visual Customization | Highly flexible (28 presets, Google Fonts, safe zones) | Advanced (manual keyframing and styling) | Standard player fonts (limited control) |
| Target Audience | Social media creators, marketing teams, mobile-first channels | Film editors, broadcast professionals | Corporate training, website embeds, standard presentations |
| Duration Support | Up to 2 hours (standard), 1 hour (4K/2K) | Unlimited | Unlimited (based on account tiers) |
Behind the Screens: The Technical Difference Between Subtitles and Captions
For creators aiming to produce highly professional video content, understanding the underlying technical concepts of on-screen text is highly beneficial.
Subtitles versus Captions
Though often grouped together, these elements serve different purposes:
- Subtitles: Designed for viewers who can hear the audio but do not understand the spoken language. They translate foreign dialogue into the viewer's native language.
- Captions: Designed for viewers who cannot hear the audio track. They include both the spoken dialogue and vital auditory descriptions, such as "phone ringing", "applause", or "soft music playing", giving full context to the scene.
Hardcoded versus Softclosed Subtitles
- Hardcoded (Open) Subtitles: These are baked directly into the video's pixels during the final rendering process. They cannot be turned off by the viewer. This is highly useful for platforms like TikTok or Instagram, where video players do not always support external caption files and where silent scrolling is common.
- Closed (Soft) Subtitles: These exist as a separate, text-based file that is processed by the video player in real-time. This format allows viewers to customize their own font size or turn the text off completely, which is common on platforms like Netflix or YouTube.
Final Thoughts
The method you choose to how to add subtitles to a video depends largely on your timeline, software accessibility, and distribution channel.
For heavy multi-track productions, offline desktop editors like Premiere Pro offer precise controls. For standard web hosting environments, platform-native closed captions on platforms like Vimeo provide viewers with toggleable flexibility.
However, when you need a fast, automated, and visually styled result for social platforms without navigating complex timelines, online tools like AddSubtitles provide a streamlined, browser-based solution to convert your spoken audio into highly readable, styled, and hardcoded videos.
About the Author
This guide was prepared by the technical specialists at AddSubtitles. Our team of video developers and localization experts is committed to simplifying video editing and digital accessibility for global creators. To learn more about our mission, our speech-to-text technology, and our commitment to user data privacy, please visit our About Us page.
Last updated: May 29, 2026